 |
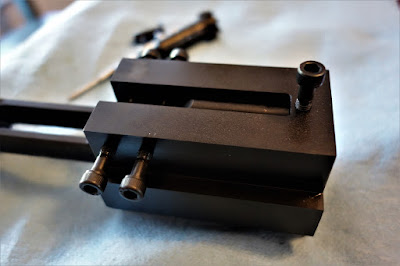
| My Black Rifle Disease Engineering (BRDE) gear. From L to R, drill bits and reamer, Dimpling Jig, and Drilling Jig. |
I've always enjoyed building my own rifles. If I had any machining skill, I'd probably do my own machining, but as it is, I'm confined to assembling my rifles from the machining skills of others. Of course, I have my personal preferences in parts and layout. For example, I believe that gas blocks should be pinned for long term durability, not simply attached by set screws. Obviously this can be a problem, as most gas blocks don't come with the ability to be pinned.
Enter Black Rifle Disease Engineering. Owned by Jake Carlson, a registered professional engineer, BRDE designs and builds a wide range of barrel dimpling and gas block drilling jigs to fit many of the gas blocks on the market today. I use the
1A PRO dimpling jig, designed for the Bravo Company Manufacturing gas block I put on this build. It will also fit other gas blocks with a .460" center to center set screw design, including VLTOR, Rainier, Fortis, Midwest Industries, SLR, Radical, Odin, and CMMG.
The design of this jig is simple, but incredibly effective. Two screws on the top help locate and hold the jig. One screw (the blued one) properly aligns the jig by centering itself in the gas port. The white screw provides additional holding power without marring your barrel through the use of a nylon tip. The two holes underneath the jig guide the included 11/64" jobber drill bit. The flat sides of the jig allow you to mount it directly into your vice for security while you drill.
 |
| Dimpling Jig on the barrel |
Using the 1A or PRO is simple. Slide the jig onto the barrel, blue screw towards the chamber. Keep an eye on the gas port, and as the jig covers the port, gently work the blue screw with your fingers until you feel it engage the port. Due to the tapered end of the screw, it will self-center, and there's no reason to go crazy tight. Hand tight, plus maybe a quarter to half turn with the hex wrench should set it in place. When you're confident the jig has centered, tighten down the secondary screw.
 |
| Dimpling Jig in the vise |
Flip the barrel and jig over and place them into your vice. I started drilling with the dimple nearest the chamber. I used regular gun oil as lube for the drill bit - one or two drops should be plenty. From here, patience - patience, patience, and more patience. Remember, you're not trying to drill a hole in the barrel, you're just trying to get a divot deep enough for the head of the set screw to rest in. You get bonus points if it turns out nice and concentric, but don't keep drilling just to get a perfect circle, no one will see it anyway.... Apply steady, even pressure and check your work often. Remember, we're talking max depths of around 1/16" here.
 |
| Dimpling complete |
A note from Jake on nitrided parts:
Melonite or Nitride treated barrels and gas blocks have a very hard
surface. Standard HSS drill bits that are included with out tools are
not hard enough to cut this surface. If you are dimpling or drilling for
pinning, you will need hard tooling. I have had mixed luck using cobalt
drills. In this application, I recommend using carbide drills. They are
substantially higher cost but in the end will save much frustration.
We try to keep the #31, 11/64" and 3/16" carbide drills in stock.
 |
| Drilling Jig ready to go |
When you're happy with the dimples, it's time to move on to the drilling jig. My jig is the
2A PRO drilling jig. First, install the gas block on the barrel, properly aligned, and tightened down. Slide the jig over the gas block and tighten the bottom set screw. Once again, one to two drops of gun oil for bit lubrication. Slow and steady wins the race. You'll find the beginning and end of the drilling the most difficult, as the bit tries to bite into the angle of the block, and again as the bit exits the block and attempts to align with the hole in the opposite side of the jig. Clean the bit frequently and apply oil as you feel necessary.
 |
| Gas block drilled |
 |
| The barrel after dimpling and drilling |
After you've drilled the block, several options exist for securing it, and BRDE has parts for every option. First, you can go with my choice and tap in a
taper pin. To do that, you'll have to take the extra step of reaming for the pin. While simple, reaming does take more time and careful effort, since you'll have to ream, check pin fit, ream, check fit, and repeat until you're satisfied with the fit. A
dowel pin is your second option, and a
coiled roll pin your third. I used a taper pin for this build, but I'm seriously considering the coiled roll pin for the next.
 |
| Fitting the taper pin |
 |
| Installing the taper pin |
I hope this has been useful for you. If you like to build, and want to add that next level of security to your gas block attachment, don't forget to check out BRDE on the
web, or on
Instagram!


