Tuesday, May 16, 2017

Samson Manufacturing SX Rail


I recently had the opportunity to test out Samson Manufacturing's new SX rail series.  Many of you are familiar with their Evolution (EVO) line of rails, as they have been a mainstay of Samson's lineup for several years.  What brought about the SX line was a desire to begin production of an M-LOK handguard.  Originally, Samson tried to build an M-LOK version of their EVO, but Magpul rejected the design because it lacked the required flats behind the slots.  Those flats allow the M-LOK T-nut to properly seat, and Magpul was concerned that the rounded shape of the EVO would conflict with good accessory mounting.

The resulting redesign is the SX series.  While a significant departure from the EVO, I'm very impressed with this rail.  Feeling significantly slimmer than the EVO, it delivers a solid performance, and it looks good doing it.  I've been running a 15" version on my 9mm Colt-pattern pistol caliber carbine for about a month now, and it's gotten attention every time I've been to the range.

A couple of differences between the SX and the EVO to note:
1) the inner diameter is smaller, coming in at 1.3" in diameter, as opposed to the EVO's 1.56",
2) it uses a proprietary barrel nut instead of the adapter plate of the EVO, and
3) it has an integrated QD at the receiver end.

With the history covered, let's focus on the SX.

Installation was simple.  The supplied barrel nut wrench interfaced flawlessly with the nut and my 1/2" drive torque wrench.  Before attempting to slide the rail over the nut, I made sure to fully tighten the bias block at the top of the rail, and loosen the two screws at the bottom. 
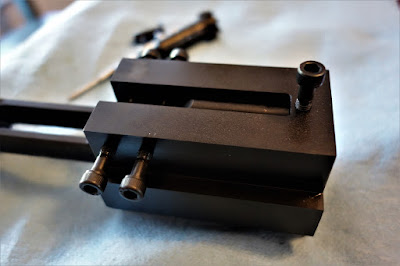
The proprietary barrel nut. Note the knurled surface and the wide groove that provides purchase for the clamp.

NOTE: If you are installing this rail over a low-pro gas block, you may need to remove the bias block before sliding the rail over the gas block, then re-install. 

The rail does fit very snug on the nut.  I personally had no issues sliding it on with my hands, but I have heard that they occasionally need a light tap with a nylon hammer.  Not really a problem to me, as that indicates a solid fit, but just a heads up.  Once the rail is seated against the receiver and aligned, tighten the two bottom screws down to the torque spec of 60 in-lbs.  To ensure alignment, I used an A2 carry handle to hold the rail in place while I torqued the screws.  The fit between the upper receiver and the top Picatinny rail was perfect on my Colt.  That's been rare, at least in my experience.  Usually there is at least a mild mismatch between the rail of the receiver and the rail of the handguard.
Using a carrying handle to ensure alignment between the upper and handguard
The bottom screws that set the clamp. Torque spec is 60 in-lbs.

Now, having worked with a lot of rails that clamp around the circumference of the nut or screw into the nut, the levered clamp design of the SX looked a little strange to me.  I'll freely admit that I had my doubts on its ability to stay put when strain was added.  So, I strained it.  And I put some real effort into it, particularly in an attempt to pull it free of the nut.  It didn't budge.  I tried rotating it, just to see if I could get it to wiggle inside the anti-rotation tabs.  No movement whatsoever.  The clamp interface between the rail and barrel nut proved itself remarkably solid, probably assisted by the knurled surface of the barrel nut and the general tight fit.  I've mounted accessories from both Impact Weapons Components and Magpul, and gotten solid lockup in the slots as well.

Overall, I think this is a rail you should take a serious look at if you're in the market.  It's got great aesthetics and solid performance.  My only "meh" was the rear QD mount, as I almost never use them, regardless of rail manufacturer.  That had nothing to do with the mount itself, just my personal setup preferences.  They do make their SXS rail without the rear QD, so consider that if you don't feel like you need the QD.  No matter if you go with the SX or SXS, you won't be disappointed. 

Check out the SX family at http://www.samson-mfg.com/category/SX.html

Wednesday, April 19, 2017

Useful Tools: Sinclair AR-15 Bolt Vise


If you've ever had to break down a bolt, you know that the ejector can be a pain to remove.  There are any number of reasons to remove an ejector, but my two are usually replacement and headspacing (some gauges won't headspace with the ejector in).  Unfortunately, the ejector is held in place by a 1/16" roll pin, that also happens to be under tension.
Good view of the recess for the lug and the hole for ejector pin removal

Enter the Sinclair AR-15 Bolt Vise.  I've used a couple of bolt takedown tools/bolt vises, but the Sinclair is an exact duplicate of the one used in the Colt armorer's course, and is by far the simplest and most reliable I've used.  It fully supports the locking lugs, has a slot to capture the bottom lug, and has a pre-drilled hole to drive the pin out through.

To use, remove the extractor and place the bolt in the vise, ensuring the ejector roll pin is properly aligned with the designated hole in the vise.  Tighten down the silver screw to take tension off the roll pin.  The screw is the same size as a case head, so it fills the bolt face and prevents the bolt from slipping side to side.  Once the screw is flat against the bolt face, drive out the roll pin with a 1/16" punch.  Once the pin is clear, slowly back out the screw until the pressure on the ejector is relieved and it is ready  to drop out.  I have had zero issues with the ejector attempting to escape, as the gradual pressure release provided by the screw prevents a "pop out" by the ejector.
The fully captured bolt, ready for ejector pin removal

To re-install the roll pin, place the ejector spring and ejector into the bolt.  Place the bolt into the vise.  While looking down through the roll pin hole, begin to slowly tighten the silver screw until you see the flat of the ejector through the hole.  Gently insert your 1/16" punch into the hole, capturing the ejector flat.  Inserting the punch at this point helps to prevent the ejector from rolling as you continue to conpress the ejector spring.  Once the screw is fully tightened, you can remove the punch and re-insert the roll pin.  Insure the roll pin is flush on both sides to prevent any issues with bolt movement within the carrier.

Hope this was helpful. If it was, consider sharing. If you think I got something wrong, feel free to shoot me an email at guntoter.official (at) gmail.com.

Friday, March 31, 2017

Why a Scout-type light?

Arisaka Defense 600 Series in one of their mounts

I see a lot of questions regarding weapons lights for AR-15 platforms.  There are a lot of options out there, from handheld flashlights in a ring mount to pistol lights to dedicated rifle lights.  Even a handheld flashlight in a ring (assuming its a quality flashlight and ring) is an improvement over nothing, but in my opinion, a 600 series Scout-type light is the ultimate AR weapon light for two simple reasons - modularity and capability.

First up - modularity. The 600 series Scout is the most modular flashlight I've found.  There are multiple options for heads, bodies, and tails.  It's completely customizable to your needs. Now, keep in mind that there are two primary Scout styles, the 300 (a single CR123) and the 600 (dual CR123). Of the two, the 600 has the most options.  The 300 is customizable as well, but not nearly as much as the 600.

For bodies, there are the original Surefire, the Arisaka 600, and the Impact Weapons Components/Haley Strategic Thorntail series.  The benefit to an aftermarket body versus the original Surefire involves intended use. Aftermarket bodies typically are designed with modular mounts (KeyMod/M-LOK) in mind, versus the standard Surefire 1913 mount.  For this reason, they tend to sit closer to the rail, minimizing snag hazards.

For heads, a 600 light can be configured to throw anywhere from 350 to 750 lumens of white light, as well as IR light for those who need the capability.  And as a modular system, you choose the level of light that you need, not just whatever stock model is offered.

For tails, you have your choice of click on/off, momentary, tape switches, or combinations. 

For mounts, you can choose 45 degree offsets, KeyMod, M-LOK, 1913, CMR, inline, the sky's pretty much the limit here.  It's all about how you plan on running your light and your gun.

As far as capability is concerned, it's something of a subset of the modularity, especially as it relates to the light head. The standard 600 head is 350 lumens, but there are white light LED versions of 550 lumens with a long focus, and 750 lumens with a wider focus. This allows you to customize based on your particular illumination needs. And while few responsibly armed citizens - or even police officers - have a need for infrared illumination (mostly due to the expense of night vision), if your mission (or budget) changes, you can find a white/IR head for your 600 as well.

So, for all the reasons above, if you are looking for an AR-mounted light, I highly recommend you consider a Scout-type 600. I personally prefer Arisaka, since they've performed well and are located not far from where I grew up, but between the big three, you probably can't go wrong.
Shedding some light on the situation

Hope this was helpful. If it was, consider sharing. If you think I got something wrong, feel free to shoot me an email at guntoter.official (at) gmail.com.

Monday, March 27, 2017

KeyMod versus M-LOK

(If you dig the pic, you can buy the patch - and the KeyMod version - at Patriot Patch Company, who I am not affiliated with)

So, I see the question: "Which is better, KeyMod or M-LOK?"  You'll see lots of opinions on either side, but I thought I'd give my observations that led me to adopt M-LOK.  I've seen some debates that center around the brand loyalty and market share, but I think it's fairly safe to say that both the VLTOR/Noveske team and Magpul have been around long enough to last in a marketing-only competition, so I'll disregard that for my purposes.

First off, a bit of background.  KeyMod actually came first in 2012.  KeyMod is completely open-source.  You can literally find the technical drawings on Wikipedia.  There is no fee, and no license to utilize KeyMod.  Magpul developed the M-LOK system as an offshoot of its MOE attachment system when they found that the KeyMod system didn't work well with polymer handguards (which, of course, Magpul specialized in).  M-LOK is a licensed system, but it is free.  Magpul requires users to sign a licensing agreement and submit their designs to Magpul for their approval.  Technical drawings are not available until the license is signed.

So why did I choose M-LOK?

1. The design of KeyMod involves machining the rail at angles on the interior of the rail.  Because of this, the rail actually gets thinner the closer it gets to the exterior of the rail.  The minimum thickness of the rail is .080", but that is at the thickest point.  The thinnest point on the key is only .026" (plus or minus .005").  That is the issue Magpul had with KeyMod - the thinner polymer at the outside was breaking.  I only have anecdotal evidence of this happening with aluminum handguards, but I still prefer the uniform thickness of M-LOK, which is a minimum of .080".

2. The M-LOK design provides more area in contact and is arguably stronger overall.  The Magpul t-nut provides ~.080" of purchase on each side of the screw shaft.  The KeyMod nut provides ~.045" on each side.  Now, the KeyMod nut fits into the angle of the key (eg., the head of the nut tapers into the shaft, as opposed to a hard 90 degree angle).  Theoretically, this should provide more holding power than a standard T of the same size, but once again, the rail is only .026" thick at its thinnest point.  I'll take a standard of .080" thick with .080" of grabbing power on each side.

3. KeyMod accessories require an additional point of contact for attachment.  Because KeyMod slides into the keys to lock, without an additional point of contact (i.e., two points of contact for a one nut attachment, three points of contact for a two nut attachment, and so on), the KeyMod accessory will literally slide backwards and out of the key slot.  This is not an issue with M-LOK.  While an accessory with only one t-nut will require a second point of contact (rare, but they exist), any accessory of two t-nuts or more should be good to go without any additional points of contact (although for accessories spanning more than one slot, additional points of contact will prevent slippage).  Requiring additional points of contact introduces more chances of failure (in my opinion).  These additional points of contact also tend to make the accessories larger, meaning they can end up heavier and take up more rail space.  This is because many designers add their additional point on either the front or back of the accessory.  Several designers have made their accessories more streamlined and added the additional point between the nuts, and thus maintaining the the same size while still keeping the additional point of contact, but that doesn't negate the fact that KeyMod will fail without the correctly machined and positioned additional points.  For the occasional M-LOK accessory that needs an extra point of contact, almost all are found between the two t-nuts.

4. Magpul's requirement of a license means standardization.  Yeah, I know, most people hate the word standardization, but it's not always bad.  Because of the licensing requirement, you are assured by Magpul that any piece of gear bearing the M-LOK logo (assuming someone didn't just throw it on there) should be compatible with any other piece of M-LOK gear.  While KeyMod is technically a standard design, anyone is realistically free to change it up, and there is no higher authority assuring compatibility.  You'll just have to see if it works, or read about it on the internet.

There are some other points, but they are mostly at the manufacturer level, and would most likely not affect an end user purchase.  I've also personally found M-LOK to be easier to install than my KeyMod parts, mostly due to the additional lug required.  I'm currently in the process of changing out to solely M-LOK.

Hopefully this has been useful for you.  If it has, feel free to like and share.  If you think I've gotten something wrong, I'm more than happy to hear from you - guntoter.official (at) gmail.com.  Thanks for reading!

Saturday, March 18, 2017

Ballistic Advantage Hanson Profile

There is considerable debate within the AR community in regards to barrel profiles.  Various factors such as barrel heating/cooling and rigidity combine to influence accuracy, both during slow fire and under the stresses of heavy fire.  The standard M4 profile barrel has been found in government after actions to be insufficient for sustained heavy fire, hence the transition by the military to the heavier M4A1 profile barrels.  In addition, the standard government profile (light under the handguards and heavier forward of the front sight) is a front-heavy design, which some users complain unbalances the barrel/gun and makes it harder to "drive" from target to target rapidly.

But what about for civilian or law enforcement users?  Most users will never attain the sustained rate of fire that military members will, but many still prefer a slightly heavier barrel for accuracy's sake.  Where does the balance lie between the (possibly slight) increase in accuracy, and the drag of having to carry a heavier gun?  Will a modified barrel profile make it easier to maneuver the gun?

I recently purchased a Ballistic Advantage 5.56 Performance 16" barrel in their Hanson profile to see if I could find that sweet spot.  I hope to have it installed and run in it some courses over the next few months.

Just to illustrate the differences between a Colt 6920 profile barrel (M4 profile) and the Ballistic Advantage Hanson profile:

The Colt barrel is ~.670" in front of the chamber and tapers to ~.600" behind the gas journal, which flares to .750", then drops to ~.740" for the remainder of the barrel. Lots of weight forward of the journal.

The Hanson barrel is a constant ~.700" under the handguard, with a .750" journal, then drops to ~.650" for the rest of the barrel. More weight is to the rear and it feels much more balanced.

Hope to have more information for you shortly!

Wednesday, March 8, 2017

Tactical Firearms with Clay Martin AAR

Clay kicking off class (PC: Great Bridge Training)
 I had the opportunity this last weekend to attend Off the Reservation's Tactical Firearms class.  The owner, Clay Martin, is a veteran of both the US Marine Corps and the US Army Special Forces, where he served in various roles including as an instructor with the Special Forces Advanced Urban Combat Course.
(PC: Boombot Media)
Tactical Firearms is a two-day rifle/pistol course.  The course requirements are 500 rounds of pistol, 700 round of rifle, and a working knowledge of your firearms.  Oak Hill Farms in Yale, VA, hosted this event, and Great Bridge Training, LLC, set up the venue, provided excellent customer service, and assisted with the class.  The staff of Great Bridge Training were awesome, and took good care of the students.

A little bit about the venue.  Yale would be considered "out of the way."  The nearest food is 15-30 minutes away, depending on what you're longing for.  I personally think it's worth it, as the venue is excellent.  It's far enough out in the country to not be bothered, but close enough that a 30 minute drive to a hotel (if you need one) isn't that bad.  I would bring food and snacks though, as taking an hour just to drive to food and back does slow down the class.  There are full bathrooms on site for your convenience.
Clay coaching the line (PC: Great Bridge Training)
The class began with two drills (one on steel for speed, and one on paper for accuracy).  Clay uses these to gauge individual student skill levels.  The start of the class is very time intensive, as Clay comes around and coaches each student individually.  The particular skills Clay focused on were trigger manipulation, grip, follow-up shots, and rapid target transition.  There was a decent amount of down time, but that was a result of the individual attention, so the trade-off was worth it, in my opinion.  Down time was occupied with reloading mags and socializing with fellow students.  Before lunch, we re-shot the speed drill to check our improvement.  I won't regurgitate Clay's philosophy here; instead I'll direct you to his own words, which will probably do a much better job.

After lunch, we moved into rifles.  Clay ran us through a basic zeroing theory lesson, then we zeroed at our choice of 100 or 50 yards.  We had some equipment failures among the students, so zeroing took a little longer than planned.  After the zeroing, we ran the 400-point aggregate - 10 shots prone at 100 yards, 10 shots sitting at 75 yards, 10 shots kneeling at 50 yards, and 10 shots standing at 25 yards.  Next we ran the 1/2 & 1/2 drill three times - 10 rounds in 10 seconds at 20 yards, 10 rounds in 5 seconds at 10 yards, and 10 rounds in 2.5 seconds at 5 yards (all standing).

After the 1/2& 1/2, we broke for dinner.  The Oak Hill Farms provided us with the use of their grill, so after a run to the store, the students cooked up hot dogs, chicken, and barbecue from a local BBQ joint.  It was great to sit down and talk and just hang out with shooters.
Night shoot (PC: Great Bridge Training)
After dinner, we conducted a night familiarization shoot.  We practiced illuminating the target with a rifle light while firing pistols, and Clay ran us through the four positions for using a handheld light to ID and engage targets with a pistol.  That concluded Saturday.

Sunday morning began with pistol draws and reloads.  Clay has a slightly different method of both drawing the gun and dropping the mag than I've been taught, but both seemed effective.  It will take some time on the range testing them out to see if I choose to switch over or not.  We had a chance to run through drills practicing draws, and both reloads with retention and slide-lock reloads.
Moving in depth (PC: Great Bridge Training)
Clay coaching moving in width (PC: Great Bridge Training)
After the pistol drills, we shifted to shooting and moving with the rifle.  We shot drills in both width and depth.  The shooting in width drills varied from the standard "walk a line and shoot 'em as you see 'em."  Clay emphasized engaging targets as you would if you were clearing your sector in a CQB environment, i.e., engaging the far target first, not the near target.

Our final lesson of Sunday involved team fire and movement (shoot/move/communicate).  We started with two-person movement dry, then worked up to four-person movement live.  Everyone had a great time with these drills, and we finished up strong.  The class wrapped up with a quick after action and lots of brass pickup.
Moving! (PC: Boombot Media)

Overall, this was an excellent class.  My biggest takeaway was from the pistol portion.  Clay makes good use of the work that the Army has done with competitive shooters, and he can transfer the material very well.  I learned that a lot of the things I was doing with my pistol (how I gripped, pinning the trigger, and working the reset) were less than optimal, and I've got a lot of work to do to unlearn and relearn those aspects.  I felt the rifle material was information I had already learned in other courses (many of which were also taught by Army vets with similar backgrounds).  All in all, the pistol section alone was completely worth it.

I did end up shooting a lot more than 500 pistol rounds, probably closer to 650 (I brought 1000).  Part of that was my own fault, as I tried to work 2-3 rounds strings as much as possible to test the new methods and their effects during rapid engagement.

Clay has a very laid-back style, which might be a little different for people who are used to very regimented courses.  Clay runs a hot range and expects guns to stay loaded and topped off.  He's also very attuned to the realities of combat and the chaos of CQB, so his take on weapons handling is not driven by flat range artificiality.
(PC: Boombot Media)
I definitely recommend taking a class with Clay if you get the chance.  You can tell he cares about the material and transferring as much as possible to the student as he can.  Plus, the price ($300 + $20 range fee) was very reasonable, especially for the caliber of instructor.  I think you'll come away with the knowledge to make yourself a better shooter.  Whether you implement those with practice afterward is up to you.

Check out Clay on the web or on Facebook.

Saturday, February 18, 2017

Gear and accessory questions on the internet


I try to monitor as many Facebook gun groups as I can (limited somewhat by my attention span and life events) in order to share any knowledge I have that might be useful to others, and also to increase my own knowledge.  Obviously, these groups are a favorite place for people to ask advice on buying gear and accessories.  Frequently, you'll see questions pop up that start with "So what is the best (insert part here - gas block, rail, sight)?"  Many times, no further information emerges from the poster until people start to comment.  Those comments take many forms, from actual helpful clarification questions to trolling.

In order to get the most out of your posting, it's essential to provide context.  In the gear and accessory world, intended usage drives almost everything else.  So the next time you ask a question, instead of asking "What's the best handguard?", ask "What's the best MLOK handguard, big enough to fit a suppressor underneath, in the $150-$200 price range?"  My answer to the first question will be "For what?"  My answer to the second question might be "Seekins Precision MCSR V2."  Another example: instead of "What's the best gas block?", try "What's the best non-adjustable gas block for a .625 inch diameter barrel?  Need it to fit under a slimline rail system with a diameter of 1.5 inches."

The better the information you can provide me, the better the information I can provide you.

Saturday, February 11, 2017

Seekins Precision SP3R M-LOK Rail Installation


This is the second review in a planned series that follows the progress of a build that I completed at the end of January.  The last review discussed the use of the Black Rifle Disease Engineering Dimple Jig and Gas Block Drilling Jig, both of which performed admirably both during that build, and during a second upper build that I did for a friend.

So now we move on to the second component I want to review: the Seekins Precision SP3R V3 Rail System.  Specifically, this review covers the installation of the SP3R.  I plan a review of its performance in March, after I've had a chance to run it a bit more.

The SP3R is a free-float rail system that uses a dual-nut system to provide a solid foundation for the rail without having to resort to shims for installation.  I personally like that feature, as the tedium of having to completely remove the barrel nut up to four times to get the timing right just doesn't appeal to me.  Instead of shims, the SP3R has a large triangle mounting nut, and a smaller titanium barrel nut.  To install, thread the triangle nut onto your upper receiver until it bottoms out.  On my upper (from Damage Industries) it actually went a little past 12 o'clock before it bottomed out.  Then back the nut out until the gas tube hole is just shy of 12 o'clock.
The SP3R's dual nut system.  Shown here with the triangle nut prepped for torquing the smaller titanium nut.
Insert your barrel and tighten the titanium nut hand tight.  Using a 1-1/8" crow's foot wrench, torque the titanium nut to a minimum of 35 ft. lbs. (maximum of 60 ft. lbs.).  You'll notice that as you torque the titanium nut, the triangle nut will move as well.  It may take some trial and error to get the gas tube hole lined up, but at least you don't have to take the nut all the way off.
The mounting system properly torqued and aligned.
Once the gas tube hole is aligned and the titanium nut is properly torqued, you can slide the rail over the triangle nut and being installing the screws.  Twelve T20 Torx screws secure the rail to the triangle nut.  Four 8-32x1/4" screws go in the top holes, and eight 8-32x3/8" screws go into the side and bottom holes.  Each screw should be torqued to 30 in. lbs. (NOT ft. lbs.).
Mounting screws going into the triangle nut.
Some things to consider with this rail:

It does not require a proprietary wrench.  It also does not come with a wrench, so if you don't have a 1-1/8" crow's foot, you'll need to buy one.  I try to buy Made in USA, so the wrench set me back another $50 from my local Mac Tools guy.

In addition to your standard torque wrench, you'll need a torque wrench that can torque the screws to 30 in. lbs.  I've had a FAT wrench for years for torquing scope mounts and such, so I just used that.
As stated above, trial and error is required to get the gas tube hole aligned.  It took me three tries, but I don't consider that excessive at all.

Over all, I found the installation simple, and I'm very pleased with it.  Now to get some rounds downrange and see how it performs!

Sunday, January 29, 2017

Useful Tools: Brownells' AR-15/M-16 Carrier Key Staking Tool

Black Friday resulted in quite a few firearms-related purchases for me.  I'd be lying if I said otherwise.  Sometimes, though, what seemed like a great deal in the moment turns out to be a little less awesome when it arrives courtesy of your friendly common carrier.

So it was in the case of a complete AR bolt carrier group that I purchased.  While the price induced me to buy, when it arrived it became quickly apparent that the staking for the carrier gas key lacked something.  And by something, I mean correct execution.  To illustrate, below is a side by side of the gas key that I bought on Black Friday on the left, and a Colt factory gas key on the right:
Clearly, the amount of material displaced in the staking process varies greatly between the two.  Having been through an AR armorer course, I can tell you that the Colt BCG illustrates the correct staking.  So what to do?  Obviously, I desired to correct the issue, because having your gas key come loose while shooting sits pretty high on the list of "crappy things that result in weapon failure."

Enter the Brownells AR-15/M16 Carrier Key Staking Tool, available for $69.99 from Brownells, incidentally where I have purchased almost every AR armorer tool I possess.  The tool embodies simplicity.  It consists of a body with five hardened screws.  Four of these screws provide the staking capability, and the other stabilizes the carrier during the process.

You simply insert the carrier as seen here:
Adjust the tension on the front screw (I kept it just past hand tight), then turn each of the staking screws 1/2 turn at a time until you achieve your desired results.  Once you feel that the screws are properly staked, back them out, release the tensioning screw, and remove your carrier.  You should achieve results similar to this:
Now, I realize that $69.99 tips the scale on the pricey side for those of you who build ARs as a hobby.  But for an armorer who conducts periodic inspections and repairs, this tool will take the guesswork out of staking repaired keys.  It really works just as simply as I described.  I couldn't even figure out how to stretch this article any further - it only took me five minutes to stake the key, and it was my first time using it!

Even though the staking screws are hardened, breakage always remains a possibility.  If you were to break a screw, fear not, Brownells covers you with four packs of replacement screws for $9.99.

So if you serve as an armorer, or just want the ability to stake your hobby guns, check it out on Brownells site.  You won't be disappointed.

Useful Tools: Black Rifle Disease Engineering's Gas Block Dimple and Drilling Jigs

My Black Rifle Disease Engineering (BRDE) gear.  From L to R, drill bits and reamer, Dimpling Jig, and Drilling Jig.

I've always enjoyed building my own rifles.  If I had any machining skill, I'd probably do my own machining, but as it is, I'm confined to assembling my rifles from the machining skills of others.  Of course, I have my personal preferences in parts and layout.  For example, I believe that gas blocks should be pinned for long term durability, not simply attached by set screws.  Obviously this can be a problem, as most gas blocks don't come with the ability to be pinned.

Enter Black Rifle Disease Engineering.  Owned by Jake Carlson, a registered professional engineer, BRDE designs and builds a wide range of barrel dimpling and gas block drilling jigs to fit many of the gas blocks on the market today.  I use the 1A PRO dimpling jig, designed for the Bravo Company Manufacturing gas block I put on this build.  It will also fit other gas blocks with a .460" center to center set screw design, including VLTOR, Rainier, Fortis, Midwest Industries, SLR, Radical, Odin, and CMMG.

The design of this jig is simple, but incredibly effective.  Two screws on the top help locate and hold the jig.  One screw (the blued one) properly aligns the jig by centering itself in the gas port.  The white screw provides additional holding power without marring your barrel through the use of a nylon tip.  The two holes underneath the jig guide the included 11/64" jobber drill bit.  The flat sides of the jig allow you to mount it directly into your vice for security while you drill.
Dimpling Jig on the barrel
Using the 1A or PRO is simple.  Slide the jig onto the barrel, blue screw towards the chamber.  Keep an eye on the gas port, and as the jig covers the port, gently work the blue screw with your fingers until you feel it engage the port.  Due to the tapered end of the screw, it will self-center, and there's no reason to go crazy tight.  Hand tight, plus maybe a quarter to half turn with the hex wrench should set it in place.  When you're confident the jig has centered, tighten down the secondary screw.

Dimpling Jig in the vise
Flip the barrel and jig over and place them into your vice.  I started drilling with the dimple nearest the chamber.  I used regular gun oil as lube for the drill bit - one or two drops should be plenty.  From here, patience - patience, patience, and more patience.  Remember, you're not trying to drill a hole in the barrel, you're just trying to get a divot deep enough for the head of the set screw to rest in.  You get bonus points if it turns out nice and concentric, but don't keep drilling just to get a perfect circle, no one will see it anyway.... Apply steady, even pressure and check your work often.  Remember, we're talking max depths of around 1/16" here.

Dimpling complete

 A note from Jake on nitrided parts:
Melonite or Nitride treated barrels and gas blocks have a very hard surface. Standard HSS drill bits that are included with out tools are not hard enough to cut this surface. If you are dimpling or drilling for pinning, you will need hard tooling. I have had mixed luck using cobalt drills. In this application, I recommend using carbide drills. They are substantially higher cost but in the end will save much frustration. We try to keep the #31, 11/64" and 3/16" carbide drills in stock.
Drilling Jig ready to go
When you're happy with the dimples, it's time to move on to the drilling jig.  My jig is the 2A PRO drilling jig.  First, install the gas block on the barrel, properly aligned, and tightened down.  Slide the jig over the gas block and tighten the bottom set screw.  Once again, one to two drops of gun oil for bit lubrication.  Slow and steady wins the race.  You'll find the beginning and end of the drilling the most difficult, as the bit tries to bite into the angle of the block, and again as the bit exits the block and attempts to align with the hole in the opposite side of the jig.  Clean the bit frequently and apply oil as you feel necessary.

Gas block drilled
The barrel after dimpling and drilling
After you've drilled the block, several options exist for securing it, and BRDE has parts for every option.  First, you can go with my choice and tap in a taper pin.  To do that, you'll have to take the extra step of reaming for the pin.  While simple, reaming does take more time and careful effort, since you'll have to ream, check pin fit, ream, check fit, and repeat until you're satisfied with the fit.  A dowel pin is your second option, and a coiled roll pin your third.  I used a taper pin for this build, but I'm seriously considering the coiled roll pin for the next. 

Fitting the taper pin
Installing the taper pin
I hope this has been useful for you.  If you like to build, and want to add that next level of security to your gas block attachment, don't forget to check out BRDE on the web, or on Instagram!